nepi-ng - A - the basics
Presentation
In this tutorial we will see a few experiments, that run ping between various locations, and on the networks available to experimenters in r2lab.
This set of experiments of increasing complexity, that you can see in the tabs bar above labelled A1 to An, are designed as a series of small incremental changes, so we can illustrate various concepts one at a time.
To this end, from one experiment to the other, we highlight the changes in the source code, in a git-like style: inserted and deleted lines are shown with a different color, so readers can see what is new in each tutorial.
Preparation
Before we can run these experiments however, we need to have
- a valid lease set in the booking system
- the 2 nodes
fit01andfit02up and running
For this first tutorial we will assume that these 2 steps have been performed manually, and here is how to proceed with that.
Getting a reservation
Once you are logged in the website, go to this page to get such a reservation. In a nutshell, the behaviour in the calendar is as follows:
- click once in a free slot to create a reservation
- drag a reservation to change it
- double click on a reservation to cancel it
- when you belong in several slices, it can also be useful to drag a slice from the left hand side list right into the calendar. Note that the current slice is the one with a back arrow; it is the one that is used when you use single click to create a reservation.
The code in this tutorial assumes you have a slice named
inria_r2lab.tutorial, which you will need of course to
replace with your actual slice name when trying to run the code
yourself.
Loading images
For loading the images manually on the 2 nodes needed here, please do
this (as usual, make sure to use your slice name instead of
your_slicename)
ssh your_slicename@faraday.inria.fr
if by any chance your public key is not at its standard location, then place
If this results in a -i option in the command line and inform the path of it.Permission denied message, go back to this
page for troubleshooting your
access, before you can proceed.
Once logged in faraday, type the following commands, which were explained in the previous tutorial:
# it's always a good idea to check you currently own the reservation
rleases --check
# turn off the whole testbed - just in case
all-off
# select nodes 1 and 2
n 1 2
# load the default image (on the selected nodes)
rload
# wait for ssh to be up (still on the selected nodes)
rwait
Running rload, which is when the default images are loaded on the 2
nodes, is going to take a couple of minutes. Here's what your output
should look like
your_slicename@faraday:~$ rleases --check
Checking current reservation for your_slicename OK

your_slicename@faraday:~$ all-off
reboot05:already off
reboot19:already off
reboot28:already off
reboot04:already off
... <snip>
reboot12:ok
reboot02:ok
reboot20:ok
reboot13:ok
Turning WiFi OFF
Starting: Intent { act=android.intent.action.MAIN cmp=com.android.settings/.wifi.WifiSettings }
Turning OFF phone : turning on airplane mode
Broadcasting: Intent { act=android.intent.action.AIRPLANE_MODE (has extras) }
Broadcast completed: result=0

your_slicename@faraday:~$ n 1 2
export NODES="fit01 fit02"
export NBNODES=2

your_slicename@faraday:~$ rload
16:12:42 - +000s: Selection: fit01 fit02
16:12:42 - +000s: Loading image /var/lib/rhubarbe-images/default.ndz
16:12:42 - +000s: AUTH: checking for a valid lease
16:12:42 - +000s: AUTH: access granted
16:12:42 - +000s: fit02 reboot = Sending message 'on' to CMC reboot02
16:12:42 - +000s: fit01 reboot = Sending message 'on' to CMC reboot01
16:12:43 - +001s: fit02 reboot = idling for 15s
16:12:43 - +001s: fit01 reboot = idling for 15s
16:12:59 - +017s: started <frisbeed@234.5.6.1:10001 on default.ndz at 500 Mibps>
16:12:59 - +017s: fit01 frisbee_status = trying to telnet..
16:12:59 - +017s: fit02 frisbee_status = trying to telnet..
... <snip>
|############################################################################################|100% |29.56s|Time: 0:00:29
16:13:44 - +062s: fit02 Uploading successful
16:13:44 - +062s: fit02 reboot = Sending message 'reset' to CMC reboot02
16:13:46 - +064s: stopped <frisbeed@234.5.6.1:10001 on default.ndz at 500 Mibps>

your_slicename@faraday:~$ rwait
<Node fit01>:ssh OK
<Node fit02>:ssh OK
At this point, both nodes have been loaded with the default image. So
you can log out of faraday.inria.fr and go back to your laptop to
run the tutorial in tab A1.
Objective
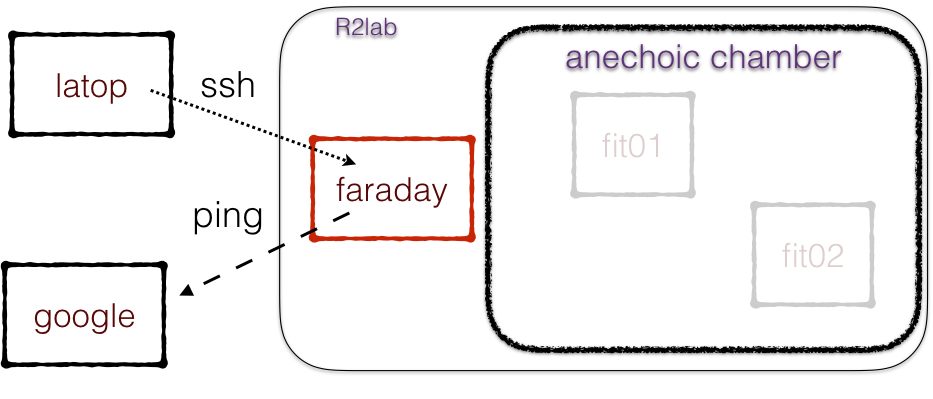
Our first experiment code is designed to run on YOUR computer. From
there we trigger a simple command on the R2lab gateway, that is to say
faraday.inria.fr; namely we will simply ping the google server
google.fr from faraday, as depicted below.
Introduction to nepi-ng
This example introduces the following classes:
SshNodeis a class that represents an ssh connection; in this present case we create one sucj object, with our credentials to enterfaraday;SshJobis a class that allows to describe what commands we want to run in anSshNode, here one single command is needed;Scheduleris the class that runs a collection ofSshJobs - even if in our case we only have one, we will soon see why this is useful when several nodes are active at the same time.
The code
Every time we will see a piece of code, you can download the raw code with the right-most button.
#!/usr/bin/env python3

from asynciojobs import Scheduler

from apssh import SshNode, SshJob

##########
# globals - how to reach the gateway
gateway_hostname  = 'faraday.inria.fr'
gateway_username  = 'inria_r2lab.tutorial'
# to get feedback on the ssh-connection and see why it fails
verbose_ssh = True

##########
# this SshNode object holds the details of
# the first-leg ssh connection to the gateway
faraday = SshNode(hostname = gateway_hostname, username = gateway_username,
                  verbose = verbose_ssh)

##########
# create an orchestration scheduler
scheduler = Scheduler()

##########
# the command we want to run in faraday is as simple as it gets
ping = SshJob(
    # on what node do we want to run this:
    node = faraday,
    # what to run
    command = [ 'ping', '-c1',  'google.fr' ],
    # add jobs in the scheduler as we create them
    scheduler = scheduler,
)

##########
# how to run the same directly with ssh - for troubleshooting
print("""--- for troubleshooting:
ssh -i /dev/null {}@{} ping -c1 google.fr
---""".format(gateway_username, gateway_hostname))

##########
# run the scheduler
ok = scheduler.orchestrate()

print("orchestrate -", ok)
Sample output
You should be able to run this script as-is, except for the slice name that you will need to change manually in the code downloaded from the link just below the picture above.
Click the '+' sign to expand this tab and see the actual output produced by the script. Click again to collapse it back.
inria_r2lab.tutorial@faraday.inria.fr:========== Connecting (direct) to inria_r2lab.tutorial@faraday.inria.fr
inria_r2lab.tutorial@faraday.inria.fr:========== Authorization OK inria_r2lab.tutorial@faraday.inria.fr
faraday.inria.fr:========== Session started for ping -c1 google.fr
faraday.inria.fr:========== Session ended for ping -c1 google.fr
--- for troubleshooting:
ssh -i /dev/null inria_r2lab.tutorial@faraday.inria.fr ping -c1 google.fr
---
faraday.inria.fr:PING google.fr (216.58.205.163) 56(84) bytes of data.
faraday.inria.fr:64 bytes from mil04s28-in-f163.1e100.net (216.58.205.163): icmp_seq=1 ttl=54 time=9.54 ms
faraday.inria.fr:
faraday.inria.fr:--- google.fr ping statistics ---
faraday.inria.fr:1 packets transmitted, 1 received, 0% packet loss, time 0ms
faraday.inria.fr:rtt min/avg/max/mdev = 9.545/9.545/9.545/0.000 ms
orchestrate - True
Next
We will now see in tab A2 how to specify your slice name on the command line, and other good practices.
Objectives
We now see a slightly different version of the same experiment, but
using standard python's
argparsemodule, we let users specify their slice on the command line with--slice inria_your.own.slicewithout having to edit the source.we introduce the
Runclass, that is a companion toSshNode, and that states thatpingis to be run on the remote side as a standard command, supposed to be preinstalled. We will see shortly that other types of commands can be used, like providing shell scripts, or dealing with files.finally, we show a good practice, which is to have your script return a meaningful return code to the OS, using
exit(). A process is expected toexit(0)when everything is going fine.
The code
#!/usr/bin/env python3

from argparse import ArgumentParser

from asynciojobs import Scheduler

from apssh import SshNode, SshJob
from apssh import Run

##########
gateway_hostname  = 'faraday.inria.fr'
gateway_username  = 'inria_r2lab.tutorial'
verbose_ssh = False

# this time we want to be able to specify username and verbose_ssh
parser = ArgumentParser()
parser.add_argument("-s", "--slice", default=gateway_username,
                    help="specify an alternate slicename, default={}"
                         .format(gateway_username))
parser.add_argument("-v", "--verbose-ssh", default=False, action='store_true',
                    help="run ssh in verbose mode")
args = parser.parse_args()

gateway_username = args.slice
verbose_ssh = args.verbose_ssh

##########
faraday = SshNode(hostname = gateway_hostname, username = gateway_username,
                  verbose = verbose_ssh)

##########
# create an orchestration scheduler
scheduler = Scheduler()

##########
# the command we want to run in faraday is as simple as it gets
ping = SshJob(
    node = faraday,
    # let's be more specific about what to run
    # we will soon see other things we can do on an ssh connection
    command = Run('ping', '-c1',  'google.fr'),
    scheduler = scheduler,
)

##########
# how to run the same directly with ssh - for troubleshooting
print("""--- for troubleshooting:
ssh -i /dev/null {}@{} ping -c1 google.fr
---""".format(gateway_username, gateway_hostname))

##########
# run the scheduler
ok = scheduler.orchestrate()

# give details if it failed
ok or scheduler.debrief()

# return something useful to your OS
exit(0 if ok else 1)
Sample output
So with all this in place you can now run the downloaded script; you
will notice the disappearance of the verbose messages that gave
details on the establishment of ssh connections and sessions, that you
can now turn back on by adding -v or --verbose to the options
--- for troubleshooting:
ssh -i /dev/null inria_radiomap@faraday.inria.fr ping -c1 google.fr
---
faraday.inria.fr:PING google.fr (216.58.205.99) 56(84) bytes of data.
faraday.inria.fr:64 bytes from mil04s26-in-f99.1e100.net (216.58.205.99): icmp_seq=1 ttl=54 time=9.69 ms
faraday.inria.fr:
faraday.inria.fr:--- google.fr ping statistics ---
faraday.inria.fr:1 packets transmitted, 1 received, 0% packet loss, time 0ms
faraday.inria.fr:rtt min/avg/max/mdev = 9.695/9.695/9.695/0.000 ms
Next
In the next tutorial in tab A3 we will see how to run commands in a node rather than on the gateway.
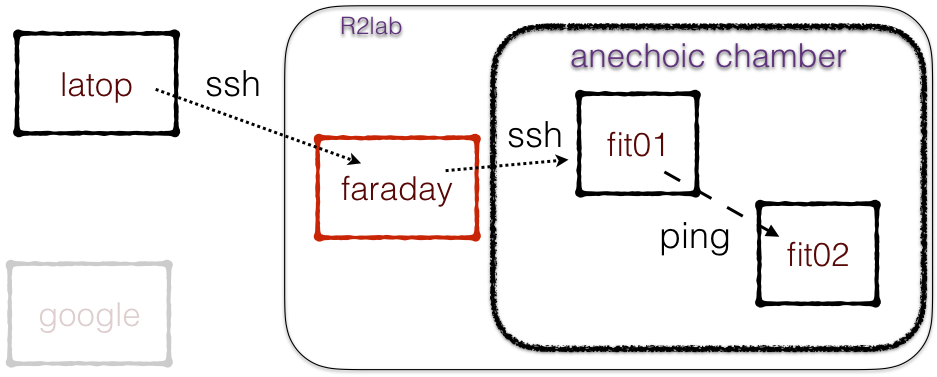
Objective : controlling a node beyond the gateway
This time, we want to run the same ping command, but from a node,
and not from the gateway.

To this end, we only need to build a second instance of an SshNode,
that leverages on the one we had created to join the gateway. This is
achieved by creating an SshNode object with the gateway =
argument.
This materializes the fact that we reach node fit01 through the
gateway. It also ensures that only one ssh connection gets established
to the gateway, regardless of the number of nodes actually controlled.
Double check: Remember that for this to work, you need to have a currently valid slice (and to use it with the --slice option if needed), and you need fit01 to be up and running.
The code
#!/usr/bin/env python3

from argparse import ArgumentParser

from asynciojobs import Scheduler

from apssh import SshNode, SshJob
from apssh import Run

##########
gateway_hostname  = 'faraday.inria.fr'
gateway_username  = 'inria_r2lab.tutorial'
verbose_ssh = False

# this time we want to be able to specify username and verbose_ssh
parser = ArgumentParser()
parser.add_argument("-s", "--slice", default=gateway_username,
                    help="specify an alternate slicename, default={}"
                         .format(gateway_username))
parser.add_argument("-v", "--verbose-ssh", default=False, action='store_true',
                    help="run ssh in verbose mode")
args = parser.parse_args()

gateway_username = args.slice
verbose_ssh = args.verbose_ssh

##########
faraday = SshNode(hostname = gateway_hostname, username = gateway_username,
                  verbose = verbose_ssh)

# saying gateway = faraday means to tunnel ssh through the gateway
node1 = SshNode(gateway = faraday, hostname = "fit01", username = "root",
                verbose = verbose_ssh)
##########
# create an orchestration scheduler
scheduler = Scheduler()

##########
# the command we want to run in node1 is as simple as it gets
ping = SshJob(
    node = node1,
    # let's be more specific about what to run
    # we will soon see other things we can do on an ssh connection
    command = Run('ping', '-c1',  'google.fr'),
    scheduler = scheduler,
)

##########
# how to run the same directly with ssh - for troubleshooting
print("""--- for troubleshooting:
ssh -i /dev/null {}@{} ssh root@fit01 ping -c1 google.fr
---""".format(gateway_username, gateway_hostname))

##########
# run the scheduler
ok = scheduler.orchestrate()

# give details if it failed
ok or scheduler.debrief()

# return something useful to your OS
exit(0 if ok else 1)
Sample output
inria_r2lab.tutorial@faraday.inria.fr:========== Connecting (direct) to inria_r2lab.tutorial@faraday.inria.fr
inria_r2lab.tutorial@faraday.inria.fr:========== Authorization OK inria_r2lab.tutorial@faraday.inria.fr
root@fit01:========== Connecting (tunnelled) to root@fit01
root@fit01:========== Authorization OK root@fit01
fit01:========== Session started for ping -c1 google.fr
fit01:========== Session ended for ping -c1 google.fr
--- for troubleshooting:
ssh -i /dev/null inria_r2lab.tutorial@faraday.inria.fr ssh root@fit01 ping -c1 google.fr
---
fit01:PING google.fr (216.58.205.163) 56(84) bytes of data.
fit01:64 bytes from mil04s28-in-f163.1e100.net (216.58.205.163): icmp_seq=1 ttl=53 time=9.76 ms
fit01:
fit01:--- google.fr ping statistics ---
fit01:1 packets transmitted, 1 received, 0% packet loss, time 0ms
fit01:rtt min/avg/max/mdev = 9.768/9.768/9.768/0.000 ms
Next
In the next improvement, we see in tab A4 how to check for leases before running our experiment.
Objectives
Our experiment now performs the exact same thing, but before it does anything, it will check that we do have a valid reservation.
This will allow us to
first, implement a good practice, because at this point your ssh access to the gateway is essentially opened once and for good; so it is a good idea to check for this early on, so you do not get error messages later on, at a point where the actual cause might be harder to figure;
second, it will us a chance to this time run one command on the gateway and one command on the node, and so to get a first glimpse at how to deal with that.
asynciojobs basics
The important things to note here are that
a
Schedulerobject is filled with any number of jobs; the order in which jobs are defined and added to the scheduler has no meaning whatsoever.the only thing that truly matters is the set of
requiresrelationships between the jobs in the scheduler. So in our example, we just run 2 jobs in sequence, so the second one is defined withrequires = check_lease.a
Schedulerdoes not propagate result values from one job to its successors. The only logic that aSchedulerknows about is that if one of its jobs raises an exception, and when that job iscritical, the scheduler then bails out immediately.In our case,
rhubarbe leases --checkreturns 0 when you currently own the reservation, and 1 otherwise, so by definingcheck_leaseascriticalwe ensure that the overall scenario will fail immediately if we do not own the reservation at that time.
Graphical view
Also in this sample, for the first time we use the export_as_dotfile on the
Scheduler object in order to produce a graphical representation of the jobs
required dependencies. In the rest of the tutorials, you will be able to
visualize this in the Graph tab of the code section.
How to produce a png file
The code does not directly produce a png file. Simply producing a dot file
allows to run the code even without the graphviz library being installed,
which was deemed too big a requirement.
You can produce a png file from a dot file with any program that supports
the dot
format. The
images depicted in the Graph tabs are produced with the dot binary (that
comes with the graphviz package).
Note on using notebooks
Please note that from within a jupyter notebook, and provided that you fulfil
the extra requirement of having the graphviz python package installed, you
can use Scheduler.graph() to create and display a graphviz.Digraph object
natively. There is no need to create an intermediary dot file, see e.g. this
link in the asynciojobs
documentation
for an example of that feature.
The code
#!/usr/bin/env python3

from argparse import ArgumentParser

from asynciojobs import Scheduler

from apssh import SshNode, SshJob
from apssh import Run

##########
gateway_hostname  = 'faraday.inria.fr'
gateway_username  = 'inria_r2lab.tutorial'
verbose_ssh = False

parser = ArgumentParser()
parser.add_argument("-s", "--slice", default=gateway_username,
                    help="specify an alternate slicename, default={}"
                         .format(gateway_username))
parser.add_argument("-v", "--verbose-ssh", default=False, action='store_true',
                    help="run ssh in verbose mode")
args = parser.parse_args()

gateway_username = args.slice
verbose_ssh = args.verbose_ssh

##########
faraday = SshNode(hostname = gateway_hostname, username = gateway_username,
                  verbose = verbose_ssh)

# saying gateway = faraday means to tunnel ssh through the gateway
node1 = SshNode(gateway = faraday, hostname = "fit01", username = "root",
                verbose = verbose_ssh)
##########
# create an orchestration scheduler
scheduler = Scheduler()

##########
check_lease = SshJob(
    # checking the lease is done on the gateway
    node = faraday,
    # this means that a failure in any of the commands
    # will cause the scheduler to bail out immediately
    critical = True,
    command = Run("rhubarbe leases --check"),
    scheduler = scheduler,
)

# the command we want to run in node1 is as simple as it gets
ping = SshJob(
    node = node1,
    # this says that we wait for check_lease to finish before we start ping
    required = check_lease,
    # let's be more specific about what to run
    # we will soon see other things we can do on an ssh connection
    command = Run('ping', '-c1',  'google.fr'),
    scheduler = scheduler,
)

##########
# run the scheduler
ok = scheduler.orchestrate()

# give details if it failed
ok or scheduler.debrief()

# producing a dot file for illustration
scheduler.export_as_dotfile("A4.dot")

# return something useful to your OS
exit(0 if ok else 1)

Sample output
faraday.inria.fr:Checking current reservation for inria_r2lab.tutorial : OK
fit01:PING google.fr (216.58.205.163) 56(84) bytes of data.
fit01:64 bytes from mil04s28-in-f163.1e100.net (216.58.205.163): icmp_seq=1 ttl=53 time=9.77 ms
fit01:
fit01:--- google.fr ping statistics ---
fit01:1 packets transmitted, 1 received, 0% packet loss, time 0ms
fit01:rtt min/avg/max/mdev = 9.777/9.777/9.777/0.000 ms
Or, when using a slice that is valid but that does not have the reservation right now:
$ python3 A4-ping.py -s inria_inria.oai.oai_build
faraday.inria.fr:Checking current reservation for inria_inria.oai.oai_build WARNING: Access currently denied
Next
Let us now see how to use other network interfaces.
Objectives
This time, we are going to run ping between two nodes in the testbed,
over the data wired network.
Each R2lab node has 4 network interfaces (not counting the special
reboot interface, that can reset and reboot the node, but that is
not visible from a linux kernel). With the images that we offer, here
is how these 4 four interfaces are managed:
controlis- a wired interface, it is the one that you actually use when you ssh into the node for the first time;
- it is automatically turned on when you boot,
- it is known as e.g.
fit01, and sits on the192.168.3.0/24subnet;
datais- another wired interface,
- that is NOT turned on automatically at boot time,
- since it is dedicated for your usage, so you can turn it on or off as you please
- even using DHCP if it is convenient for you; in this case its IP address
will be on
192.168.2.x/24and known to DNS as e.g.data01
atheros, andintel- both are the 2 WiFi interfaces,
- that are also NOT turned on automatically at boot-time
- so it is your entire responsability to set them up.
We will see how to manage the wireless interfaces in the next tutorial.
But for now we will run ping from fit01 to fit02, and using the data interface on each node, so we can see how to turn these on and off.
Here is what deserves to be outlined in the code below
on all nodes you will find a command named
turn-on-data; this of course is not a standard command, it is preinstalled on the nodes for your convenience. It's job is to turn on the data interface using DHCP.you will find this command documented if you type
helpwhen logged on any node;take a look at the source code for similar utilities here
also notice how we can very easily make sure to run our ping once BOTH nodes have configured their data interface, by just using 2 jobs in the
requiresattribute of the ping job;Finally, notice how at the epilogue we check that the ping command actually succeeded, by using
result()on aSshJobinstance.
The code
#!/usr/bin/env python3

from argparse import ArgumentParser

from asynciojobs import Scheduler

from apssh import SshNode, SshJob
from apssh import Run

##########
gateway_hostname  = 'faraday.inria.fr'
gateway_username  = 'inria_r2lab.tutorial'
verbose_ssh = False

parser = ArgumentParser()
parser.add_argument("-s", "--slice", default=gateway_username,
                    help="specify an alternate slicename, default={}"
                         .format(gateway_username))
parser.add_argument("-v", "--verbose-ssh", default=False, action='store_true',
                    help="run ssh in verbose mode")
args = parser.parse_args()

gateway_username = args.slice
verbose_ssh = args.verbose_ssh

##########
faraday = SshNode(hostname = gateway_hostname, username = gateway_username,
                  verbose = verbose_ssh)

node1 = SshNode(gateway = faraday, hostname = "fit01", username = "root",
                verbose = verbose_ssh)
node2 = SshNode(gateway = faraday, hostname = "fit02", username = "root",
                verbose = verbose_ssh)

##########
# create an orchestration scheduler
scheduler = Scheduler()

##########
check_lease = SshJob(
    # checking the lease is done on the gateway
    node = faraday,
    # this means that a failure in any of the commands
    # will cause the scheduler to bail out immediately
    critical = True,
    command = Run("rhubarbe leases --check"),
    scheduler = scheduler,
)

##########
# setting up the data interface on both fit01 and fit02
init_node_01 = SshJob(
    node = node1,
    command = Run("turn-on-data"),
    required = check_lease,
    scheduler = scheduler,
)
init_node_02 = SshJob(
    node = node2,
    command = Run("turn-on-data"),
    required = check_lease,
    scheduler = scheduler,
)

# the command we want to run in node1 is as simple as it gets
ping = SshJob(
    node = node1,
    # wait for the 2 init jobs instead
    # check_release is guaranteed to have completed anyway
    required = (init_node_01, init_node_02),
    # let's be more specific about what to run
    # we will soon see other things we can do on an ssh connection
    command = Run('ping', '-c1', '-I', 'data', 'data02'),
    scheduler = scheduler,
)

##########
# run the scheduler
ok = scheduler.orchestrate()

# give details if it failed
ok or scheduler.debrief()

# we say this is a success if the ping command succeeded
# the result() of the SshJob is the value that the command
# returns to the OS
# so it's a success if this value is 0
success = ok and ping.result() == 0

# producing a dot file for illustration
scheduler.export_as_dotfile("A5.dot")

# return something useful to your OS
exit(0 if success else 1)

Sample output
fit02:turn-on-data: data network on interface data
fit01:turn-on-data: data network on interface data
faraday.inria.fr:Checking current reservation for inria_r2lab.tutorial : OK
fit02:data
fit01:data
fit01:PING data02 (192.168.2.2) from 192.168.2.1 data: 56(84) bytes of data.
fit01:64 bytes from data02 (192.168.2.2): icmp_seq=1 ttl=64 time=0.363 ms
fit01:
fit01:--- data02 ping statistics ---
fit01:1 packets transmitted, 1 received, 0% packet loss, time 0ms
fit01:rtt min/avg/max/mdev = 0.363/0.363/0.363/0.000 ms
Next
We can now wrap up this A-series.
Summary
At this point, you should have a rather good understanding of the following fundamentals of R2lab:
Interfaces
Each node has 4 network interfaces, control being considered
reserved for testbed administration, the other ones being reserved for
the experimenter who is in charge of setting them up.
nepi-ng
By leveraging the standard asyncio library, and by combining the
asynciojobs and apssh libraries on top of that, it is possible to
write scripts that are
- reasonably simple and short
- able to run as many jobs as needed simultaneously and in a single thread
- able to deal with simple synchronization constraints.
Next
In the B-series, we will see how to deal with the more complex task of setting up a wireless network.
In the C-series, we will address file
transfers to and from SshNodes.